How Do You Focus a Laser Engraver?
Laser engravers have revolutionized the way we create and customize objects, offering precision and versatility across various materials. However, achieving optimal results depends heavily on properly focusing the laser. Knowing how to focus a laser engraver is essential for both novice and experienced users, as it ensures accuracy, efficiency, and safety in your engraving projects.
Understanding the Basics
Before diving into the focusing process, it’s important to understand the components of a laser engraver and how they work together. A typical laser engraver consists of a laser source, mirrors or lenses to direct the beam, and a focusing lens. The laser beam is focused into a fine point, which is what enables it to engrave or cut with high precision.
Why Focusing is Crucial
Proper focus is crucial because it determines the intensity and precision of the laser beam at the point of contact with the material. A correctly focused laser produces a clean, sharp engraving with minimal wastage of material and energy. On the other hand, an unfocused laser can result in blurred, uneven engravings and can even damage the material or the machine.
Steps to Focus a Laser Engraver
Focusing a laser engraver involves a few critical steps, which may vary slightly depending on the model of your machine. Here’s a step-by-step guide on how to focus your laser engraver effectively:
Safety First
Before you begin, ensure you’re following all safety protocols. Wear protective eyewear specifically designed for your laser’s wavelength, and make sure the workspace is well-ventilated to avoid inhaling fumes from the engraving process.
Understand Your Machine
Familiarize yourself with your laser engraver’s manual and the focusing mechanism it uses. Some common types of focusing mechanisms include:
- Manual Focus: Requires manual adjustment of the focusing lens or the bed height.
- Auto Focus: Automatically adjusts the focus based on sensor readings.
- Fixed Focus: Uses a fixed focal length lens, often requiring adjustment of the bed height.
Identify the Focal Length
The focal length is the distance from the focusing lens to the point where the laser beam converges to its smallest diameter. This distance is crucial for achieving a fine point of focus. Your machine’s manual will specify the focal length, which can range from a few millimeters to several centimeters depending on the laser engraver model.
Position the Material
Place the material to be engraved on the bed of the laser engraver. Ensure it is flat and securely positioned to prevent any movement during the engraving process.
Adjust the Focus
Depending on your machine’s focusing mechanism, follow these steps:
Manual Focus
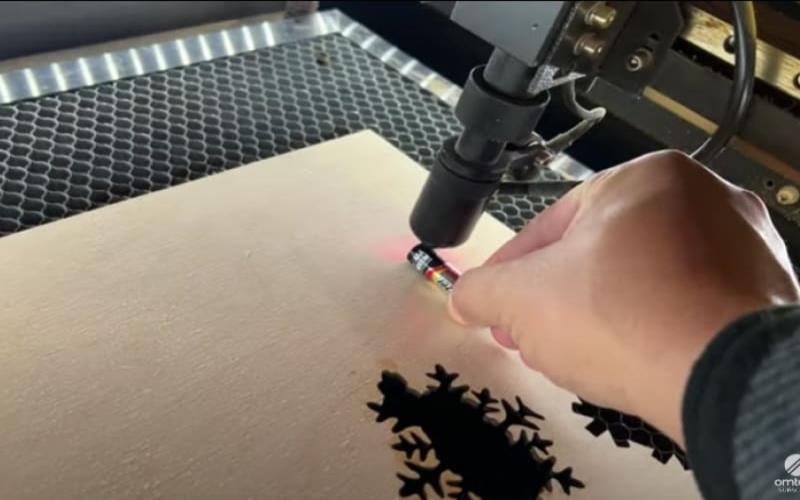
- Use a Focus Tool: Many laser engravers come with a focus tool or gauge. Place the tool between the laser head and the material, then adjust the bed height or the lens position until the tool fits snugly.
- Focus by Eye: If your machine does not have a focus tool, you can manually adjust by lowering the bed until the laser dot is at its smallest size. Use a piece of scrap material and run a few test engravings to fine-tune the focus.
Auto Focus
- Activate Auto Focus: Your machine’s auto-focus function will adjust the laser head or bed height automatically. Ensure that the sensors are clean and functioning properly for accurate readings.
- Verify Focus: Even with auto-focus, it’s good practice to verify the focus by running a test engraving and checking the quality.
Fixed Focus
- Adjust Bed Height: If your machine uses a fixed-focus lens, you will need to adjust the bed’s height to achieve the correct focal distance. Measure the distance from the lens to the material and adjust it until it matches the specified focal length.
- Use a Spacer: Some fixed focus systems come with spacers or shims to ensure the correct distance. Place the spacer between the lens and the material, then adjust the bed height until the spacer fits snugly.
Test and Fine-Tune
After adjusting the focus, it’s essential to run a test engraving. Use a piece of scrap material similar to your final workpiece and engrave a small design or pattern. Check the results for sharpness and clarity. If necessary, make minor adjustments to the focus and repeat the test until you achieve optimal results.
Lock the Focus
Once you’ve achieved the desired focus, lock the focusing mechanism to prevent accidental adjustments during the engraving process. Double-check that all settings are secure before starting your final engraving.
Tips for Maintaining Focus
Maintaining the correct focus over time is crucial for consistent results. Here are some tips to help you keep your laser engraver in top condition:
- Regular Cleaning: Keep the lenses and mirrors clean to ensure the laser beam is not obstructed. Dust and debris can affect the focus and overall performance.
- Check Calibration: Periodically check the calibration of your focusing mechanism and adjust as needed. Over time, vibrations and use can cause components to shift slightly.
- Monitor Wear and Tear: Inspect the focusing lens for any signs of wear or damage. A scratched or damaged lens can affect the focus and quality of your engravings.
- Consistent Material Thickness: When working with different materials, ensure they are of consistent thickness to avoid having to readjust the focus frequently.
Troubleshooting Common Issues
Despite your best efforts, you may encounter issues with your laser engraver’s focus. Here are some common problems and how to address them:
- Blurred Engravings: If your engravings appear blurred, recheck the focal length and ensure the material is flat and secure.
- Uneven Cuts: Uneven cuts can result from an incorrect focus or a tilted bed. Verify the focus and ensure the bed is level.
- Weak Laser Output: A weak laser output can be caused by a dirty lens or a misaligned focus. Clean the lens and recheck the focus.
- Frequent Refocusing: If you frequently need to refocus, check for loose components in the focusing mechanism and tighten them as necessary.
Advanced Focusing Techniques
For those looking to achieve even greater precision, there are advanced techniques you can explore:
- Dynamic Focus: Some high-end laser engravers offer dynamic focusing capabilities, allowing you to adjust the focus in real time during the engraving process. This is particularly useful for working with materials of varying thickness or complex designs.
- Beam Collimation: Adjusting the collimation of the laser beam can help achieve a finer focus. This involves aligning the laser beam to ensure it remains parallel before it reaches the focusing lens.
- Using Multiple Lenses: In some cases, using a combination of lenses can help achieve a more precise focus. Consult your laser engraver’s manual or a professional for guidance on this technique.
Conclusion
Mastering the art of focusing a laser engraver is key to achieving high-quality engravings and maximizing the efficiency of your machine. By understanding the fundamentals, following the proper steps, and maintaining your equipment, you can ensure that your laser engraver consistently delivers sharp, precise results. Whether you’re a hobbyist or a professional, knowing how to focus a laser engraver will enhance your projects and expand your creative possibilities tamil bio.